Homemade Chili Recipe: Easy, Hearty and Full of Flavor
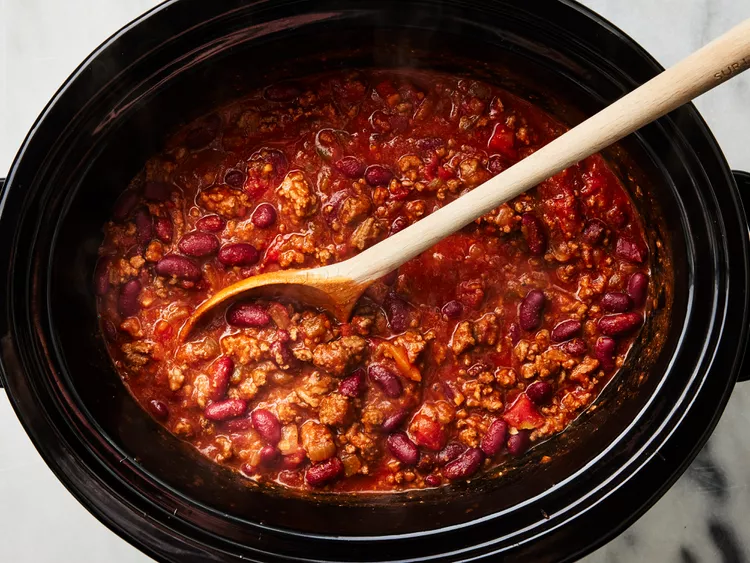
A great homemade chili recipe should be thick, deeply savory, gently smoky, and satisfying enough to stand on its own as dinner. This classic version delivers exactly that with browned ground beef, tender beans, tomatoes, aromatic vegetables, and a carefully balanced blend of chili powder, cumin, paprika, and oregano.
The secret to memorable chili is not simply adding more spice. Building flavor in stages makes the difference. Browning the beef develops savory depth, cooking the onions and peppers until softened creates a flavorful foundation, and simmering everything together gives the tomatoes and spices enough time to mellow into a rich, cohesive sauce.
This easy homemade chili is also practical. Most of the ingredients are pantry staples, the recipe uses one pot, and leftovers taste even better after a night in the refrigerator. Serve it for a weeknight dinner, game day, a casual gathering, or any cold evening when you want something warm and substantial.
Prep time: 15 minutes
Cook time: 50 minutes
Total time: 1 hour 5 minutes
Servings: 6
Difficulty: Easy
Why This Homemade Chili Recipe Works
Classic chili depends on a balance of meat, beans, vegetables, tomatoes, spices, and liquid. Too much broth produces soup rather than chili, while too little can prevent the flavors from melding properly.
This recipe starts with ground beef cooked until properly browned. Onion, bell pepper, garlic, and spices are then added before tomatoes, beans, and beef broth go into the pot. A slow, uncovered simmer reduces the liquid naturally and concentrates the flavors.
The result is hearty without being excessively heavy, with enough sauce to coat every spoonful of beef and beans.
Ingredients
For the Chili
- 1 tablespoon olive oil
- 1 1/2 pounds ground beef, preferably 85% lean
- 1 medium yellow onion, diced
- 1 medium red or green bell pepper, diced
- 4 garlic cloves, minced
- 3 tablespoons chili powder
- 2 teaspoons ground cumin
- 1 teaspoon smoked paprika
- 1 teaspoon dried oregano
- 1/4 teaspoon cayenne pepper, optional
- 1 1/2 teaspoons kosher salt, plus more to taste
- 1/2 teaspoon freshly ground black pepper
- 2 tablespoons tomato paste
- 1 (28-ounce) can crushed tomatoes
- 1 (15-ounce) can diced tomatoes, undrained
- 1 (15-ounce) can kidney beans, drained and rinsed
- 1 (15-ounce) can pinto beans, drained and rinsed
- 1 cup low-sodium beef broth
- 1 teaspoon Worcestershire sauce
Optional Toppings
- Shredded sharp cheddar cheese
- Sour cream
- Sliced green onions
- Chopped fresh cilantro
- Diced avocado
- Sliced jalapeños
- Crushed tortilla chips
- Lime wedges
How to Make Homemade Chili
1. Brown the Ground Beef
Heat a large Dutch oven or heavy-bottomed pot over medium-high heat. Add the olive oil, followed by the ground beef.
Spread the beef over the bottom of the pot and allow it to cook undisturbed for 2 to 3 minutes before breaking it into smaller pieces. Continue cooking for about 5 to 7 minutes, until thoroughly browned and no pink remains.
If the beef releases an excessive amount of fat, carefully spoon off some of it, leaving approximately 1 tablespoon in the pot for flavor.
Proper browning is important. The caramelized surface on the meat gives the finished chili significantly more savory depth than beef that has merely steamed.
2. Cook the Onion and Bell Pepper
Add the diced onion and bell pepper directly to the browned beef.
Cook over medium heat for 5 to 6 minutes, stirring occasionally, until the vegetables have softened and the onion becomes translucent.
Add the garlic and cook for another 30 seconds, stirring constantly so it does not burn.
3. Bloom the Spices
Add the chili powder, cumin, smoked paprika, oregano, cayenne, salt, and black pepper.
Stir continuously for approximately 30 seconds, until the spices become noticeably fragrant.
Briefly heating dried spices in the fat helps release their aromatic compounds and gives the chili a fuller flavor.
4. Cook the Tomato Paste
Stir in the tomato paste and cook for 1 to 2 minutes.
The paste should darken slightly and begin sticking to the bottom of the pot in places. Cooking tomato paste before adding liquid removes some of its raw acidity while developing additional sweetness and savory character.
5. Add the Tomatoes, Beans, and Broth
Pour in the crushed tomatoes, diced tomatoes and their juices, kidney beans, pinto beans, beef broth, and Worcestershire sauce.
Stir thoroughly, scraping the bottom of the pot to loosen any browned bits.
Bring the chili to a gentle boil.
6. Simmer Until Thickened
Reduce the heat to low or medium-low and maintain a gentle simmer.
Cook uncovered for 30 to 40 minutes, stirring every 8 to 10 minutes to prevent scorching.
The finished chili should be thick but still spoonable. The sauce should coat the beef and beans rather than pool around them.
If the chili becomes too thick before the flavors have fully developed, add beef broth 1/4 cup at a time.
7. Taste and Adjust
Taste the chili before serving.
Add additional salt or black pepper if needed. For more heat, stir in a pinch of cayenne or a few dashes of your preferred hot sauce.
Allow the chili to rest off the heat for about 5 minutes. This brief resting period helps it settle and thicken slightly before serving.
Expert Tips for the Best Homemade Chili
Brown the Beef Instead of Steaming It
Use a wide, heavy pot and give the meat enough time to develop dark browned areas. Avoid constantly stirring it immediately after it hits the pan.
If doubling the recipe, brown the beef in batches. Overcrowding the pot traps steam and makes browning difficult.
Do Not Skip the Tomato Paste
Tomato paste gives homemade beef chili a concentrated tomato flavor and contributes to its thick, rich consistency. Cooking it briefly before adding the liquids produces noticeably better results.
Control the Heat Separately From the Flavor
Chili powder contributes considerably more than heat. It provides earthy chile flavor and often contains complementary spices.
Cayenne is the easier ingredient to adjust when you simply want a hotter chili. Start conservatively because more can always be added later.
Let the Chili Reduce Naturally
An uncovered simmer allows excess moisture to evaporate and concentrates flavor without requiring flour or cornstarch.
For an even thicker consistency, mash a small portion of the beans against the side of the pot and stir them back into the chili.
Make It a Day Ahead
Like many slow-simmered dishes, homemade chili is particularly good the following day. Refrigeration gives the spices and savory ingredients time to meld, creating an even more cohesive flavor.
Homemade Chili Variations
Turkey Chili
Replace the ground beef with the same amount of ground turkey. Because turkey is leaner, you may want an additional teaspoon or two of olive oil when browning it.
Spicy Homemade Chili
Increase the cayenne to 1/2 teaspoon and add a finely diced jalapeño with the bell pepper. For stronger chile flavor, a minced chipotle pepper in adobo can also be added.
Bean-Free Chili
Omit both cans of beans and increase the ground beef to approximately 2 pounds. Reduce the beef broth slightly if necessary to maintain a thick consistency.
Vegetarian Chili
Omit the ground beef and Worcestershire sauce unless using a vegetarian version. Add another can of beans along with 8 ounces of chopped mushrooms and 1 cup of corn. Vegetable broth can replace the beef broth.
Gluten-Free Chili
The main ingredients are naturally gluten-free, but check the labels on the Worcestershire sauce, broth, chili powder, and canned products to confirm that they meet your dietary requirements.
Lighter Chili
Use lean ground beef or ground turkey and reduce the cheese and sour cream toppings. The beans provide plenty of body, so the finished dish will remain substantial.
What to Serve With Homemade Chili
A bowl of steaming classic beef chili works particularly well with contrasting textures. Cornbread is an ideal companion because its slightly sweet, crumbly texture balances the savory, mildly spicy sauce.
For something crisp, serve chili with tortilla chips or a simple green salad dressed with a bright vinaigrette. Baked potatoes are another excellent option: spoon the chili over split potatoes and finish them with cheddar and green onions.
For a larger gathering, create a chili topping station with shredded cheese, sour cream, avocado, jalapeños, cilantro, green onions, tortilla chips, and lime wedges. Guests can customize each bowl according to their preferred balance of creamy, spicy, fresh, and crunchy ingredients.
Storage and Make-Ahead Instructions
Refrigerating
Allow leftover chili to cool before transferring it to an airtight container. Refrigerate promptly and keep for up to 4 days.
Chili frequently develops an even richer flavor after sitting overnight, making this recipe particularly suitable for meal preparation.
Freezing
Homemade chili freezes very well.
Transfer completely cooled chili into freezer-safe containers, leaving a little space for expansion. Freeze for up to 3 months for the best quality.
For convenient lunches or dinners, freeze individual portions rather than one large container.
Thaw frozen chili overnight in the refrigerator before reheating.
Reheating
Reheat chili in a saucepan over medium-low heat, stirring occasionally, until it reaches 165°F throughout.
If it has become particularly thick during storage, add a small splash of beef broth or water.
Individual portions can also be reheated in the microwave. Cover loosely and heat in intervals, stirring between each interval, until piping hot throughout.
Frequently Asked Questions
How Long Should Homemade Chili Simmer?
About 30 to 40 minutes of uncovered simmering is sufficient for this recipe. A slightly longer simmer can deepen the flavor further, but monitor the consistency and add a small amount of broth if the chili becomes too thick.
How Do You Make Chili Thicker?
The simplest method is to simmer it uncovered. As moisture evaporates, the sauce naturally becomes thicker and more concentrated.
You can also mash some of the beans into the sauce. This releases their starch and thickens the chili without adding flour.
Can You Make Homemade Chili in Advance?
Yes. Chili is one of the best make-ahead dinners because its flavor often improves after several hours or overnight in the refrigerator. Prepare it a day ahead, refrigerate it, and gently reheat before serving.
What Kind of Beans Are Best for Chili?
Kidney and pinto beans offer a useful combination of textures and are widely available. Black beans can replace either variety if preferred.
Can I Double This Recipe?
Yes. Use a large Dutch oven or stockpot and brown the meat in batches to avoid overcrowding. Once everything is combined, allow additional time for the larger quantity to return to a simmer.
Nutrition Information
Estimated nutrition per serving, based on 6 servings and excluding optional toppings:
| Nutrient | Amount Per Serving |
|---|---|
| Calories | 490 kcal |
| Protein | 34 g |
| Fat | 22 g |
| Saturated Fat | 7 g |
| Carbohydrates | 40 g |
| Fiber | 11 g |
| Sugar | 9 g |
| Sodium | 890 mg |
Nutrition values are approximate and will vary depending on the brands of canned tomatoes, beans, broth, Worcestershire sauce, and ground beef used.
Final Thoughts
This homemade chili recipe combines everything that makes classic chili enduringly popular: browned beef, creamy beans, tomatoes, aromatic vegetables, warming spices, and a thick sauce that becomes richer as it simmers.
It is straightforward enough for an ordinary weeknight but substantial enough for game day, family dinners, potlucks, and casual entertaining. Better still, the recipe is easy to adapt. Adjust the heat, change the beans, substitute turkey, or prepare it ahead and let the flavors develop overnight.
For the best bowl, give the beef time to brown properly, briefly toast the spices, cook the tomato paste until concentrated, and let the finished chili simmer uncovered until thick. Finish with cheddar, sour cream, green onions, or avocado and serve it hot with cornbread or crisp tortilla chips for a satisfying, complete meal.