


The Ultimate Sticky Baked BBQ Chicken Drumsticks Recipe
There is a distinct culinary joy in a perfectly executed barbecue chicken drumstick. When done right, it delivers an irresistible contrast of textures: deeply caramelized, sticky-sweet skin on the outside, giving way to incredibly tender, juicy meat on the inside. While outdoor grilling has its charms, the oven offers unparalleled temperature control, making it the absolute best vehicle for achieving consistent, foolproof results without burning the delicate sugars in your favorite barbecue sauce.
This recipe elevates the humble chicken leg from a simple weeknight standby to a crave-worthy centerpiece. By utilizing a strategic two-step baking process and a simple structural technique, we ensure the chicken yields maximum flavor with a glossy, finger-licking lacquer. It is a crowd-pleasing dish that feels both nostalgically comforting and professionally polished—perfect for casual family dinners, weekend game days, or summer gatherings.
Why This Oven-Baked Method Works
Achieving competition-level barbecue in a standard home kitchen comes down to food science and temperature management. Many home cooks make the mistake of slathering barbecue sauce onto raw chicken before it goes into the oven. Because traditional BBQ sauce has a high sugar content—often derived from brown sugar, molasses, or honey—introducing it too early guarantees the exterior will scorch and turn bitter long before the interior meat reaches a safe consumption temperature.
This recipe remedies that issue through a calculated timeline:
-
The Dry-Heat Phase: The drumsticks are initially seasoned with a potent dry rub and baked at a high temperature ($400^\circ\text{F}$) on an elevated wire rack. This allows hot air to circulate completely around the meat, rendering out excess fat and drying the skin so it can crisp effectively.
-
The Glazing Phase: The sauce is introduced only during the final 15 minutes of cooking. Applied in multiple thin layers and returned to the oven, the sauce undergoes rapid reduction and caramelization, creating a perfectly set, sticky glaze that clings to the meat rather than running off onto the baking sheet.
Ingredients You Will Need
For the best results, select plump, high-quality chicken drumsticks with the skin completely intact. The skin acts as a protective barrier that seals in natural juices during the high-heat roasting process.
For the Chicken and Dry Rub
-
3 pounds chicken drumsticks (approximately 8 to 10 pieces), patted completely dry
-
1 tablespoon olive oil (or any neutral high-smoke-point oil like avocado or canola)
-
1 tablespoon dark brown sugar, packed
-
1 tablespoon smoked paprika (adds an authentic wood-fired aroma)
-
1 teaspoon garlic powder
-
1 teaspoon onion powder
-
1 teaspoon kosher salt
-
1/2 teaspoon freshly cracked black pepper
-
1/4 teaspoon cayenne pepper (optional, for a subtle background warmth)
For the BBQ Glaze
-
1 cup premium barbecue sauce (choose a thick, tomato-based sauce like a Kansas City style)
-
1 tablespoon apple cider vinegar (brightens the sauce and cuts through the richness)
-
1 tablespoon honey (enhances the glossy sheen and stickiness of the final glaze)
For the Garnish
-
2 tablespoons fresh chives or scallions, finely sliced
Step-by-Step Cooking Instructions
Step 1: Prep the Oven and Baking Sheet
Preheat your oven to $400^\circ\text{F}$ ($204^\circ\text{C}$) with the oven rack positioned in the center. Line a large, rimmed baking sheet with heavy-duty aluminum foil for effortless cleanup. Place a sturdy metal wire cooling rack directly inside the baking sheet and lightly coat it with nonstick cooking spray. Elevating the drumsticks is critical; it prevents them from braising in their own pooling juices.
Step 2: Dry and Season the Drumsticks
Using paper towels, thoroughly pat each chicken drumstick dry. Removing surface moisture is an essential prerequisite for achieving optimal skin texture. Place the dried drumsticks into a large mixing bowl and drizzle with the olive oil, tossing until evenly coated.
In a small bowl, combine the dark brown sugar, smoked paprika, garlic powder, onion powder, kosher salt, black pepper, and cayenne pepper. Blend the spices thoroughly with a fork, breaking up any clumps of sugar. Sprinkle the rub over the chicken and use your hands to massage the spices into the meat, ensuring every crevice is seasoned.
+-------------------------------------------------------+
|  Pro Tip: Thoroughly drying the chicken skin removes  |
|  surface moisture, allowing the oil and dry rub to     |
|  adhere perfectly while maximizing crispness.          |
+-------------------------------------------------------+
Step 3: The Initial Bake
Arrange the seasoned drumsticks on the prepared wire rack, leaving at least an inch of space between each piece to permit optimal airflow.
   [ Space ]     [ Space ]     [ Space ]
     (O)           (O)           (O)
    /   \         /   \         /   \
   ||===||       ||===||       ||===||  <- Drumsticks on Wire Rack
========================================= <- Foil-Lined Baking Sheet
Transfer the baking sheet to the preheated oven. Bake undisturbed for 30 minutes. At this juncture, the chicken fat will begin to render, the skin will shrink slightly and tighten, and the aromatic spices will form a beautiful, fragrant crust.
Step 4: Prepare the Enhanced Barbecue Glaze
While the chicken is completing its first stint in the oven, prepare the glazing mixture. In a medium bowl, whisk together the barbecue sauce, apple cider vinegar, and honey until smooth and integrated. The addition of vinegar thins the commercial sauce just enough to make it brushable, while the honey ensures it bakes down into a mirror-like finish.
Step 5: Glaze and Caramelize
Carefully remove the baking sheet from the oven. Using a silicone pastry brush, generously coat the top and sides of each drumstick with a layer of the barbecue sauce mixture. Use tongs to flip the drumsticks over and paint the reverse sides.
Return the chicken to the oven and bake for 7 minutes. Remove the pan a second time, apply another uniform layer of sauce to all sides, and return to the oven for a final 7 to 8 minutes.
Step 6: Rest and Serve
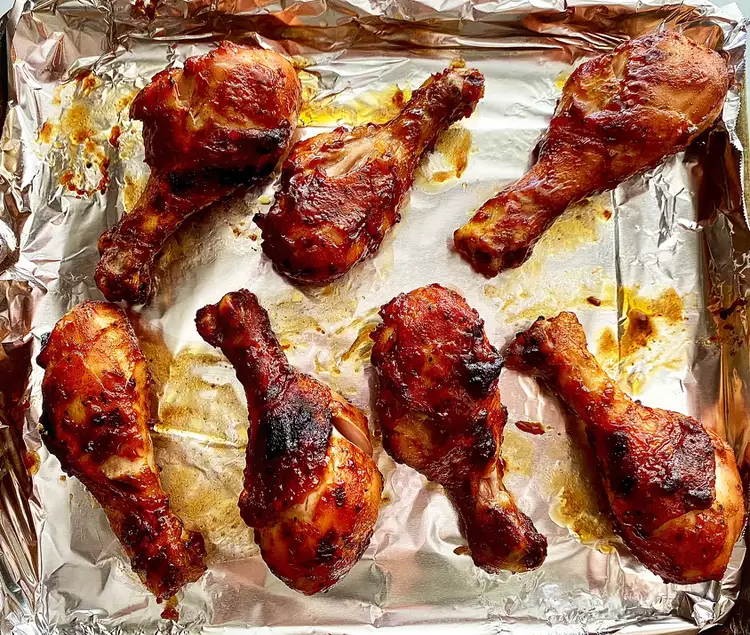
The drumsticks are finished when the sauce is bubbling, deeply caramelized at the edges, and an instant-read digital meat thermometer inserted into the thickest part of the drumstick (without touching the bone) registers between $175^\circ\text{F}$ and $185^\circ\text{F}$ ($79^\circ\text{C}$ to $85^\circ\text{C}$).
Transfer the chicken to a warm serving platter. Let the drumsticks rest for 5 minutes before serving; this allows the bubbling juices within the dark meat to redistribute, ensuring every bite is exceptionally succulent. Garnish with a sprinkle of finely sliced chives or scallions just before presenting.
Expert Tips and Ingredient Variations
-
The Internal Temperature Sweet Spot: While the USDA states that chicken is safe to consume at $165^\circ\text{F}$, dark meat cuts like thighs and drumsticks contain a high amount of connective tissue and collagen. This tissue melts down into gelatin between $175^\circ\text{F}$ and $185^\circ\text{F}$, yielding a far more tender texture that effortlessly pulls away from the bone.
-
The Broiler Finish: If you prefer an extra-charred, smoky aesthetic reminiscent of an outdoor grill, turn your oven to the “Broil” setting during the final 2 minutes of cooking. Watch the chicken closely, as sugars can transition from caramelized to burnt in a matter of seconds.
-
Spicy Variation: To add a bold kick, whisk 1 tablespoon of gochujang (Korean chili paste) or your favorite habanero hot sauce directly into the barbecue glaze.
-
Lighter Option: For a lower-sugar alternative, swap the traditional brown sugar and honey for an organic monk fruit sweetener alternative, and utilize a registered zero-sugar, keto-friendly commercial barbecue sauce.
Ingredient Substitution Reference
| Original Ingredient | Suitable Substitution | Culinary Effect |
| Dark Brown Sugar | Light brown sugar or coconut sugar | Slightly less molasses depth, but identical caramelization. |
| Smoked Paprika | Sweet paprika plus a drop of liquid smoke | Provides the vibrant red hue with a controlled smoky profile. |
| Apple Cider Vinegar | White wine vinegar or fresh lime juice | Maintains the required acidity to balance the heavy sugars. |
| Honey | Pure maple syrup or molasses | Offers a deeper, autumn-forward flavor profile with great stickiness. |
Serving Suggestions
Baked BBQ chicken drumsticks are inherently versatile, anchoring everything from a casual weeknight dinner table to a festive potluck spread.
To complement the rich, smoky, and sweet profile of the barbecue sauce, pair the chicken with side dishes that offer high contrast in texture and temperature:
-
The Classics: Serve alongside a chilled, vinegar-based coleslaw to provide a crisp, refreshing crunch that cuts through the richness of the dark meat.
-
Warm Accompaniments: Pair with rich mac and cheese, cast-iron buttermilk cornbread with honey butter, or garlic-herb roasted potato wedges.
-
Fresh Elements: A bright, seasonal garden salad dressed in a sharp lemon-herb vinaigrette or grilled corn on the cob provides an excellent, light balance to the meal.
Storage and Make-Ahead Notes
Refrigeration
Store any leftover barbecue drumsticks in an airtight glass container in the refrigerator within two hours of cooking. Kept properly, the cooked chicken will maintain peak quality and flavor for up to 4 days.
Freezing
To freeze, allow the drumsticks to cool completely to room temperature. Wrap each individual drumstick securely in plastic wrap to prevent freezer burn, then place them collectively into a heavy-duty, zip-top freezer bag. Freeze for up to 3 months. Thaw completely in the refrigerator overnight before reheating.
Reheating Instructions
To preserve the crisp exterior and prevent the meat from drying out, avoid using the microwave for leftovers. Instead, arrange the drumsticks on a foil-lined baking sheet and tent a piece of foil loosely over the top. Bake in a preheated oven at $350^\circ\text{F}$ ($177^\circ\text{C}$) for 12 to 15 minutes, removing the top foil layer during the final 5 minutes to allow the glaze to re-crisp and become sticky once again.
Nutrition Information
The following values represent a realistic estimation for a single serving of baked barbecue chicken drumsticks (calculated as 2 medium-sized glazed drumsticks):
-
Calories: 340 kcal
-
Protein: 28 g
-
Fat: 14 g
-
Saturated Fat: 3.5 g
-
Carbohydrates: 24 g
-
Fiber: 1 g
-
Sugar: 19 g
-
Sodium: 780 mg
Disclaimer: Nutritional values are estimates derived from standard ingredient databases and can fluctuate based on the specific brand of commercial barbecue sauce and size of chicken pieces utilized.